
Natural ventilation involves the modeling of operable windows to introduce outdoor air into a space to provide both cooling and ventilation. There are different approaches to natural ventilation that could be utilized for new construction as well as retrofit. Three types of natural ventilation approaches include:
Energy savings = Cooling Energy Savings (in all three cases). The savings are a result of the reduced time and amount of cooling energy required for spaces, zone groups, floors and entire buildings. Natural Ventilation can be an effective energy efficiency strategy to reduce cooling energy consumption in climates where it can be utilized for a majority of the year, as well as others where it may be beneficial only part of the time throughout the year, such as in shoulder seasons.
Simergy is a graphical user interface for EnergyPlus. EnergyPlus is composed of a number of different types of objects that have properties that enable the models to be set up and simulate. Simergy attempts to present the objects in their properties in a more user friendly manner than if you were just engaging EnergyPlus directly using the IDF editor. We believe that transparency is useful, and that you and others will benefit if we can guide you to the source in EnergyPlus that can inform input values and potentially explain certain types of results. Therefore throughout this guide you will see reference to EnergyPlus objects and links to the EnergyPlus Input Output Reference, which is one of the important EnergyPlus references (another is the Engineering Reference Guide).
Simergy allows you to analyze different configurations of all three types of natural ventilation strategies at the overall building level as well as for specific portions and zone groups of the building. However, this version of Simergy does have its limitations. EnergyPlus is capable of analyzing a more comprehensive set of strategies.
Simergy provides two options for modeling natural ventilation: simple and detailed.
Note that a simulation cannot contain both simple and detailed natural ventilation objects.
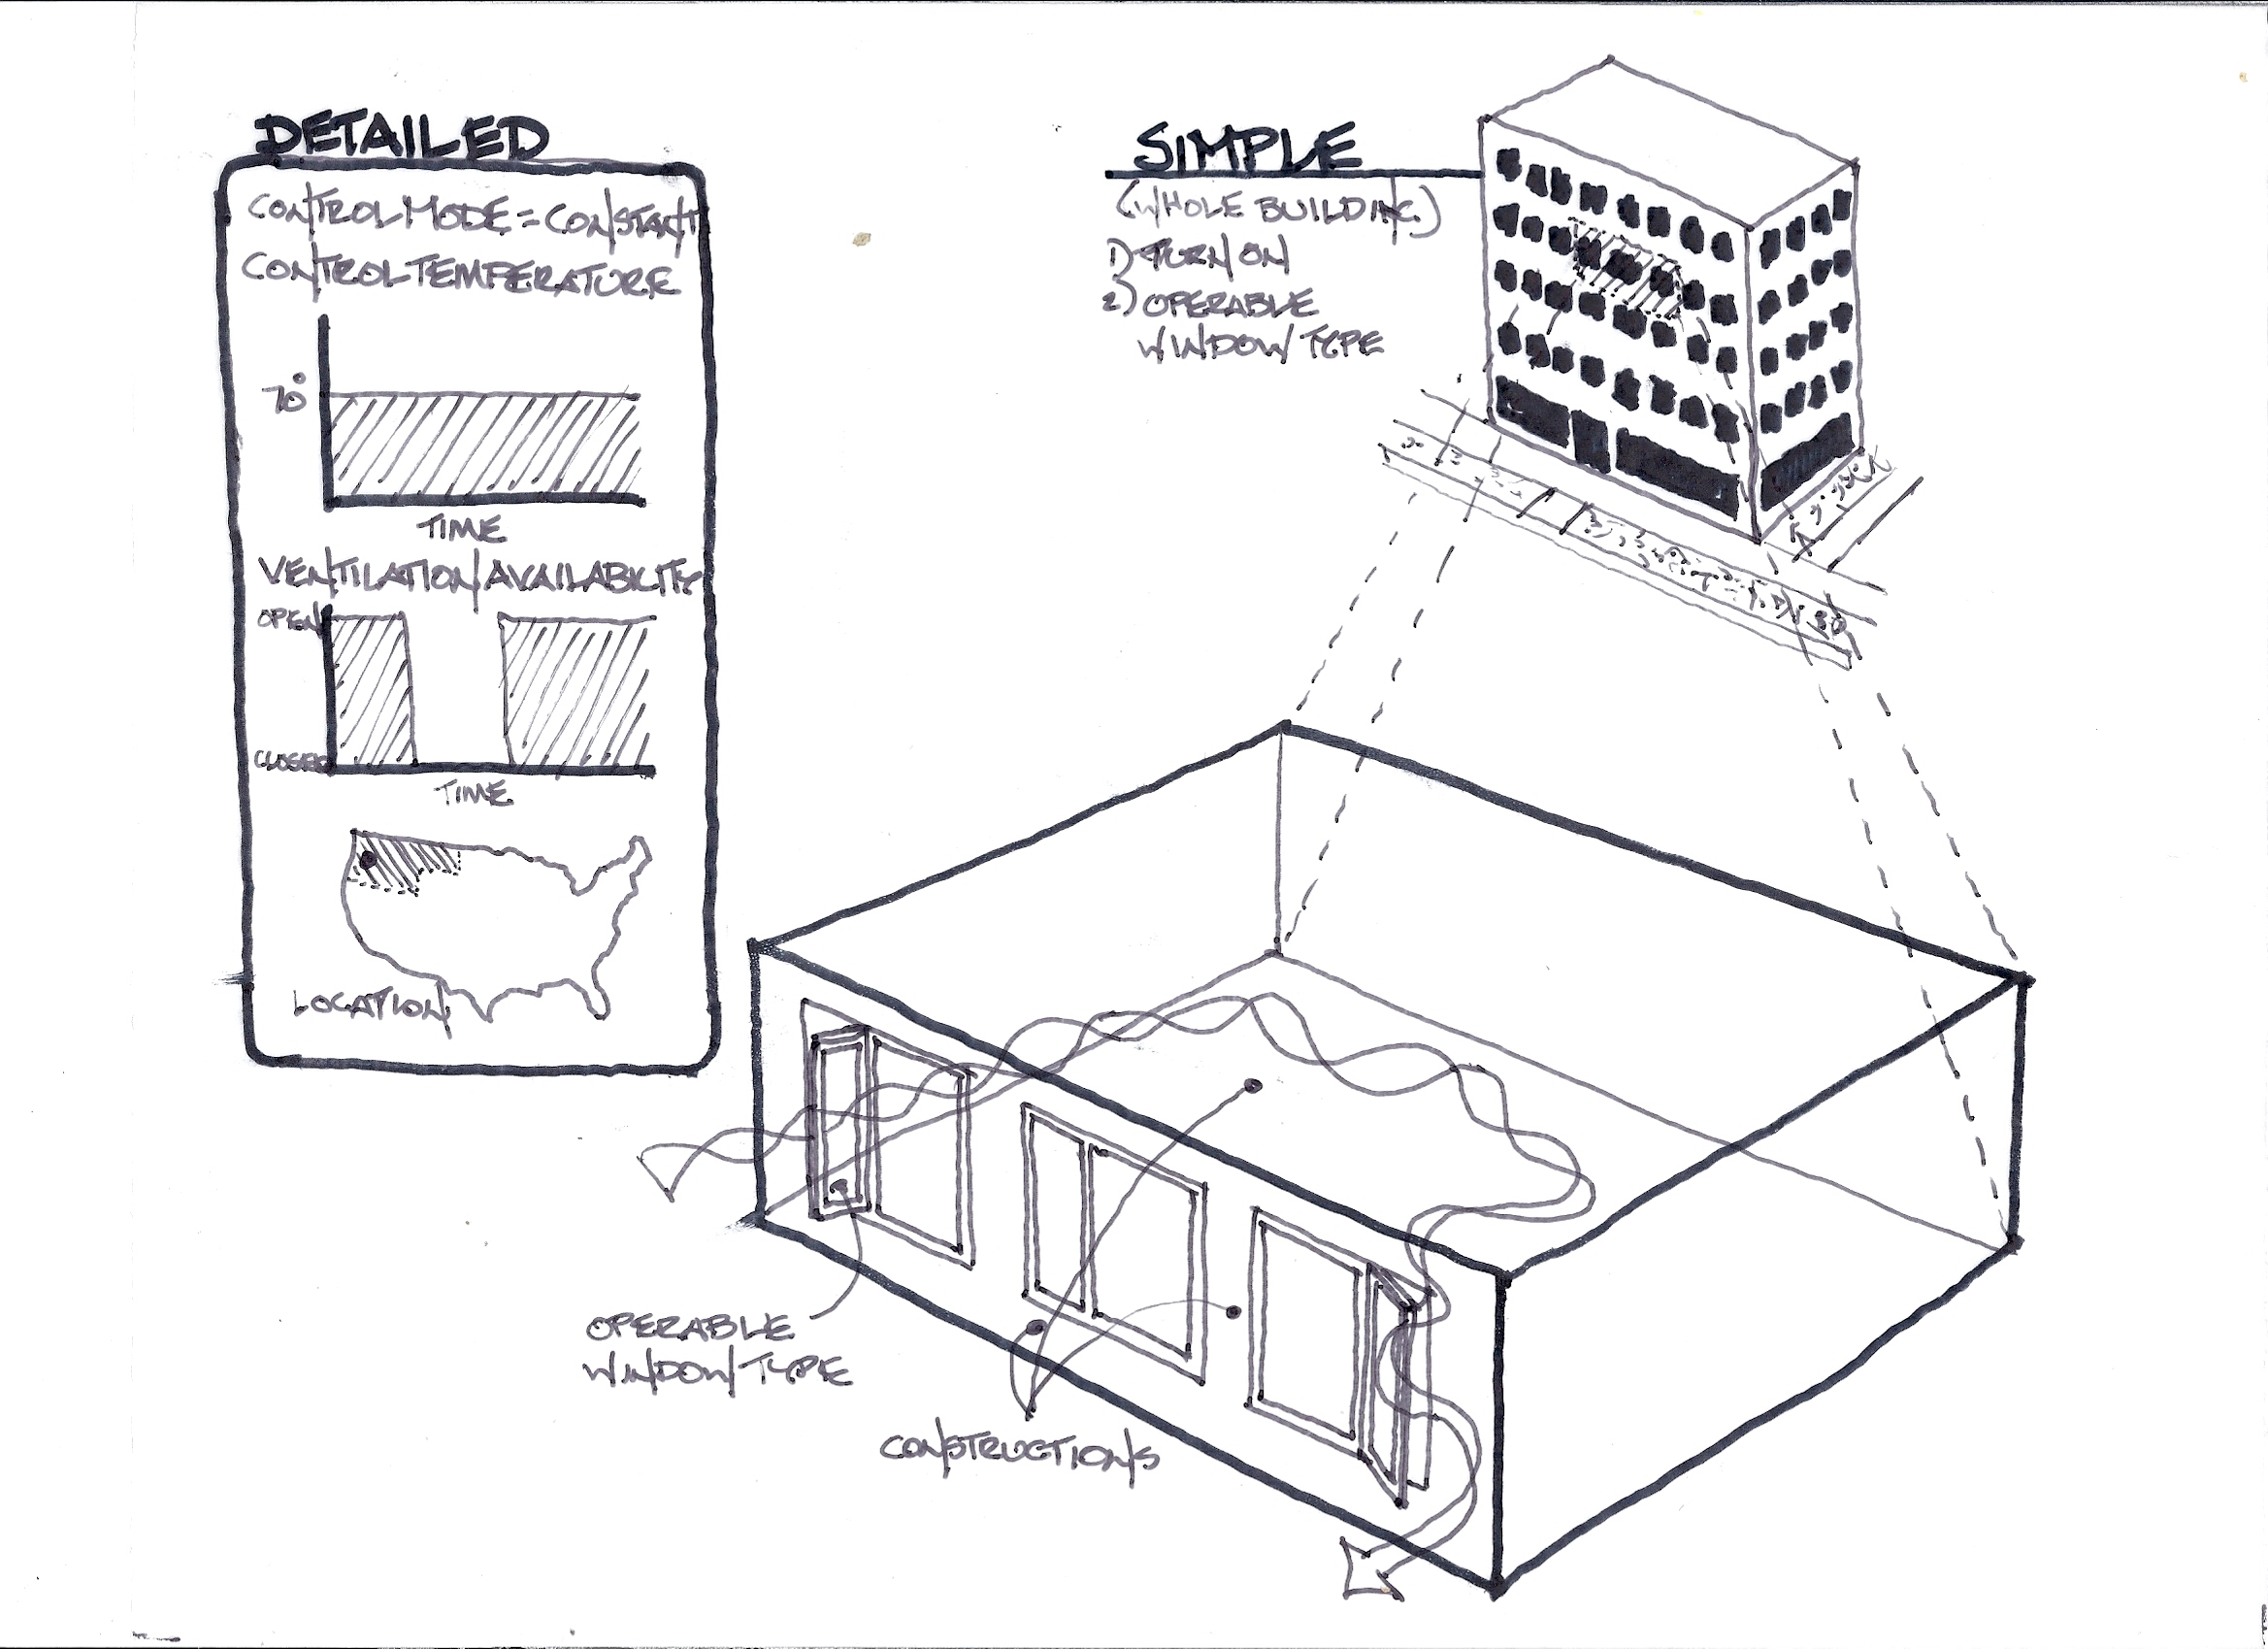
Diagram displaying different aspects of Simergy Natural Ventilation capabilities. Simple = whole building where few inputs are required. Detailed = Natural Ventilation Group (single zone or multiple) that requires more detailed inputs and schedules to determine when the windows are open as well as how they open.
The table displays different types of natural ventilation modeling, and identifies if this can be fully completed in the current version of Simergy or if it could be set up in Simergy and exported to EnergyPlus to complete.
| Natural Ventilation Modeling | Simergy
(current version) |
Set up in Simergy and Export to EnergyPlus |
| NatVent - Single Sided | Yes | |
| NatVent - Cross Ventilation | Yes | |
| NatVent - Stack Ventilation | Yes | |
| NatVent - Stack Ventilation (complex) | Yes | |
| Night Flushing - Single Sided | Yes | |
| Night Flushing - Cross Ventilation | Yes | |
| Mixed Mode Ventilation | Yes | |
| Mixed Mode Ventilation (complex) | Yes |
The Natural Ventilation Guide goes through a series of NatVent Design Scenarios to explain the capabilities and provide examples/tutorials that will assist you to set up and simulate your own Natural Ventilations models in Simergy
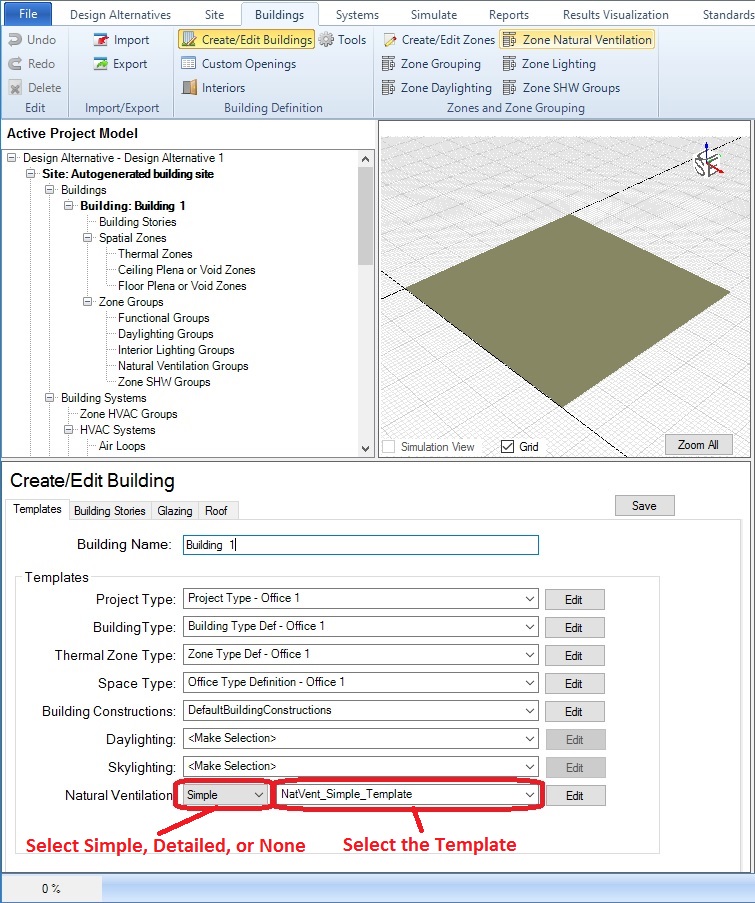
Workspace = Buildings > Create/Edit Building > Building Section
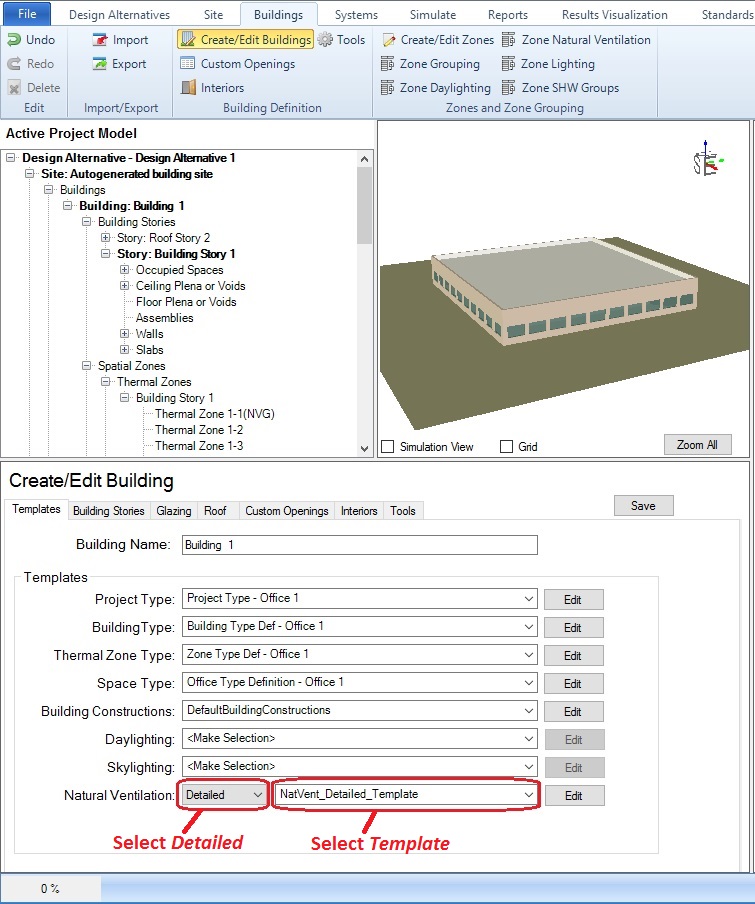
Building Tab - Select Simple (options = Simple or Detailed) from the drop down list next to Natural Ventilation.
Select a Natural Ventilation Template from the next drop down menu that contains the desired inputs for your whole building natural ventilation scheme. Selecting a Natural Ventilation Template at the Buildings level will apply this template to every thermal zone in the building.
Note: A set of Natural Ventilation Templates are installed with Simergy or they can be defined within the Templates tab.
Activating Simple Natural Ventilation - highlights where the 'Simple Mode' can be selected, and the NatVent Simple Template can be selected.
You can view and make changes to the Simple Natural Ventilation Template by selecting Edit, which will open a pop-up dialog box, which provides the same capability as if you were working in the Templates > Natural Ventilation workspace.
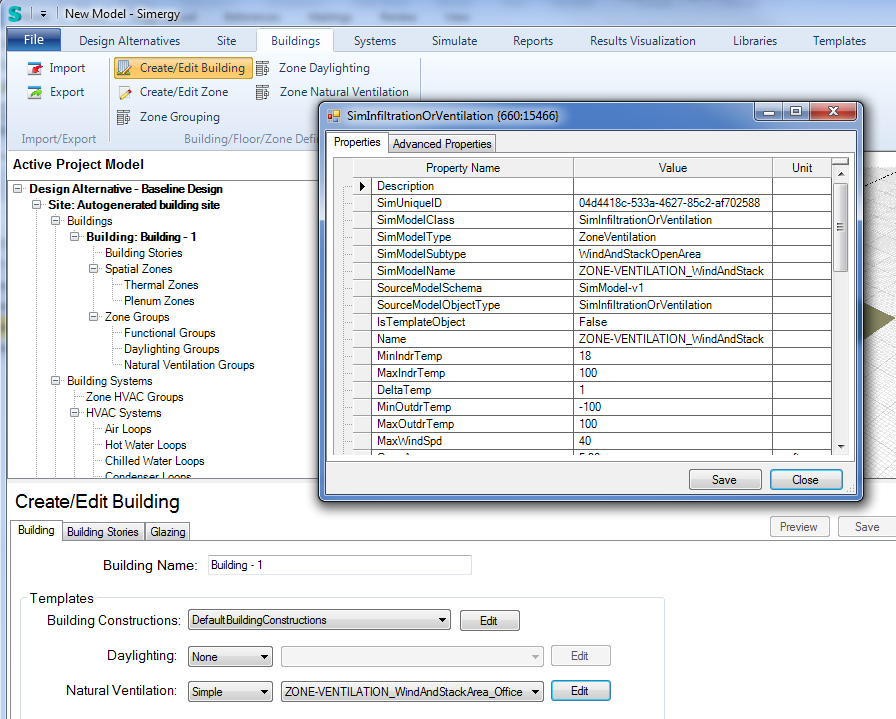
Edit: Natural Ventilation Template - displays the dialog box that appears when the EDIT button is selected. You can edit the values in this dialog box, which will change the instance of that Natural Ventilation Template in your model.
Select a Operable Window Simple type when you are creating the building geometry and glazing or you can select and apply an Operable Window Simple type after the envelope has been created. See Assigning Operable Window Types.
The simple natural ventilation option employs the EnergyPlus object ZoneVentilation:WindandStackOpenArea (More information on this object can be found in the EnergyPlus Input/Output reference), which, with simplified equations, calculates wind and buoyancy driven flows at the zone level based on the wind direction, indoor-outdoor temperature difference, and several user-input values (opening area, opening effectiveness, height difference, etc).
In this case the Natural Ventilation Template selected at the whole building level will be applied to every zone in the model except those zones that are part of a Zone Natural Ventilation Groups that you set up. The Natural Ventilation Template selected for the Zone Natural Ventilation Group will override the template selected at the whole building level for the zones included in the Zone Natural Ventilation Group. This type of model approach is more likely when using Detailed: Natural Ventilation, but it can be utilized for Simple: Natural Ventilation as well.
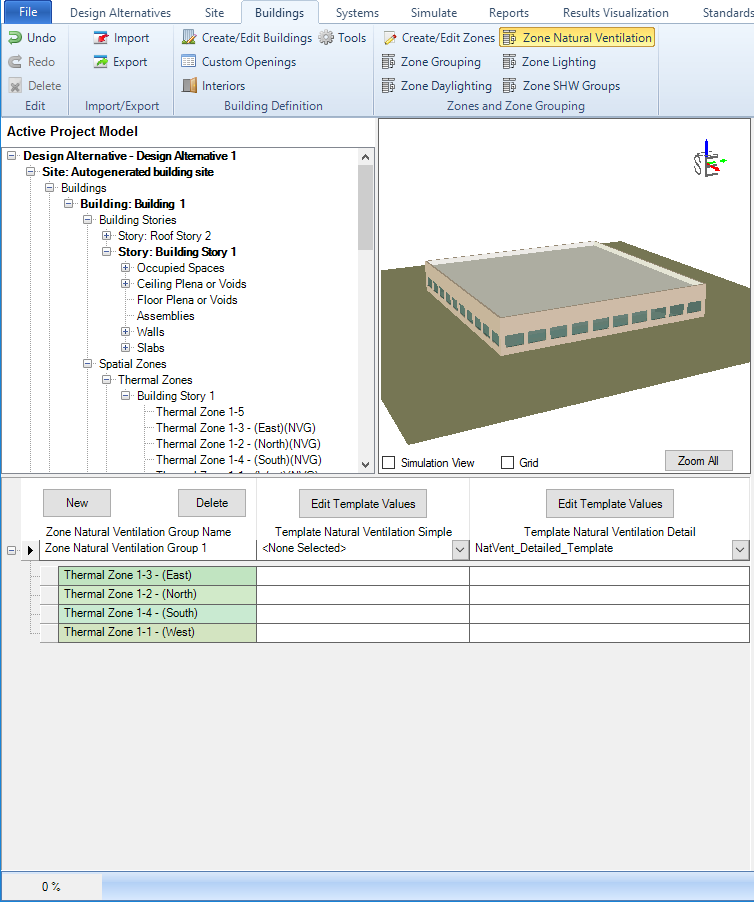
Workspace = Buildings > Zone Natural Ventilation
To set up Zone Natural Ventilation Groups and assign Natural Ventilation Templates, do the following:
Click New to create a new Zone Natural Ventilation Group.
Select and drag thermal zones to add them to the Zone Natural Ventilation Group that was just created.
Select a Natural Ventilation Simple Template from the drop down list in the second column of the table.
Note: This step is optional
Similar to the "Edit" button on the Building Tab, the Edit Templates Values can be selected which will open a pop-up dialog box, providing the same capability to make changes to the Natural Ventilation Template as if you were working in the Templates > Natural Ventilation workspace. However, when you make and save changes here it is changing the inputs for the 'instance' of the template that is being used in your BIM, and IS NOT CHANGING the values in the Natural Ventilation Template.
Note: This step is optional
Consider what Operable Window Simple type was selected at the whole building level and if you would like to change the window type in areas of the building where the zones in the Zone Natural Ventilation groups are located or not. See Assigning Operable Window Types.
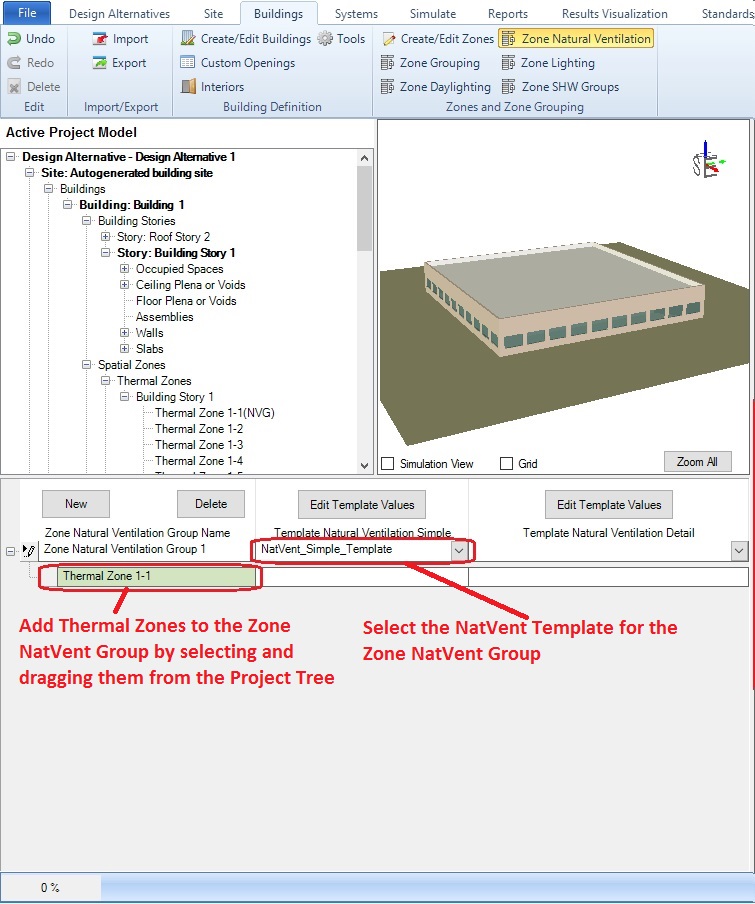
Zone Natural Ventilation Group - the screenshot shows where the thermal zones that have been dragged and dropped from the Active Project Model tree are located in the table (rows below the Zone NatVentGroup line), and the column where the drop down list is located for the NatVent Simple Template.
Like the simple natural ventilation option, the user has the ability to define a single template for a whole building on the Buildings tab. Selecting a template at the building level applies that template to every thermal zone in the building. In the most basic Detailed natural ventilation scenario, all you need to do is the steps that were described above:
Select Detailed from the first drop down list on the Natural Ventilation row.
Select a Detailed Natural Ventilation Template from the second drop down list. Selecting the natural ventilation template at the Buildings level will apply this template to every thermal zone in the building.
Note: Source for the drop down list is Templates: Natural Ventilation
Activating Simple Natural Ventilation - highlights where the 'Simple Mode' can be selected, and the NatVent Simple Template can be selected.
Note: This step is optional
You can view and make changes to the Detailed Natural Ventilation Template by selecting Edit, which will open a pop-up dialog box, which provides the same capability as if you were working in the Templates > Natural Ventilation workspace. Each drop down list in the value column of the table is linked to a Libraries category that is the source for the list. You can either select a library entry from the available set packaged with the Simergy installation or create your own within the Libraries category. The Detailed Natural Ventilation Template topic identifies the drop down list source for each row and provides links to descriptions.
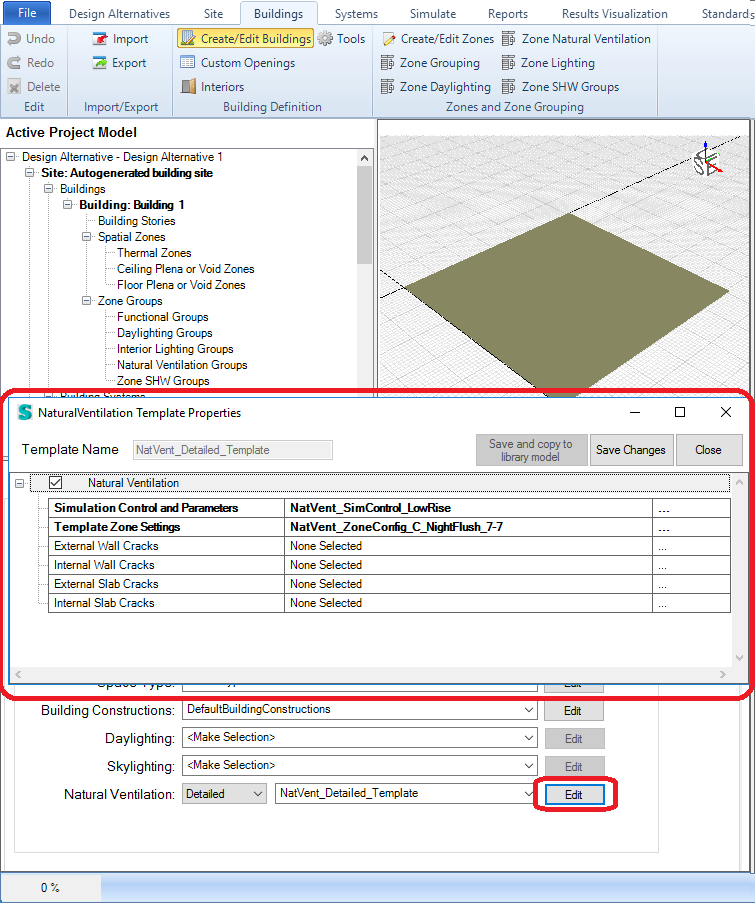
Edit: Natural Ventilation Template - displays the dialog box that appears when the EDIT button is selected. You can edit the values in this dialog box, which will change the instance of that Natural Ventilation Template in your model.
Note: This step is optional
Select a Operable Window Simple type when you are creating the building geometry and glazing or you can select and apply an Operable Window Simple type after the envelope has been created. See Assigning Operable Window Types.
The detailed natural ventilation option employs the Airflow Network, a bulk airflow model built in to the EnergyPlus interface. It is a nodal model that treats each zone as a node and each opening as a linkage. Wind and buoyancy pressures are calculated at each opening and used to establish the airflow rate between adjacent zones and between zones and the outdoors.
You can also assign different detailed NV templates to single or multiple Zone Natural Ventilation Groups. This is achieved through the Zone Natural Ventilation tab.
Workspace = Buildings > Zone Natural Ventilation
To set up Zone Natural Ventilation Groups and assign Natural Ventilation Templates, do the following:
Click New to create a new Zone Natural Ventilation Group.
Select and drag thermal zones to add them to the Zone Natural Ventilation Group that was just created.
Select a Natural Ventilation Simple Template from the drop down list in the second column of the table.
Note: This step is optional
Similar to the "Edit" button on the Building Tab, the Edit Templates Values can be selected which will open a pop-up dialog box, providing the same capability to make changes to the Natural Ventilation Template as if you were working in the Templates > Natural Ventilation workspace. However, when you make and save changes here it is changing the inputs for the 'instance' of the template that is being used in your BIM, and IS NOT CHANGING the values in the Natural Ventilation Template.
Note: Just as on the Building tab, you can select Edit Template Values, it will open a pop-up dialog box, which provides the same capability as if you were working in the Templates > Natural Ventilation workspace.
Note: This step is optional
Consider what Operable Window Detailed type was selected at the whole building level and if you would like to change the window type in areas of the building where the zones in the Zone Natural Ventilation groups are located or not. See Assigning Operable Window Types.
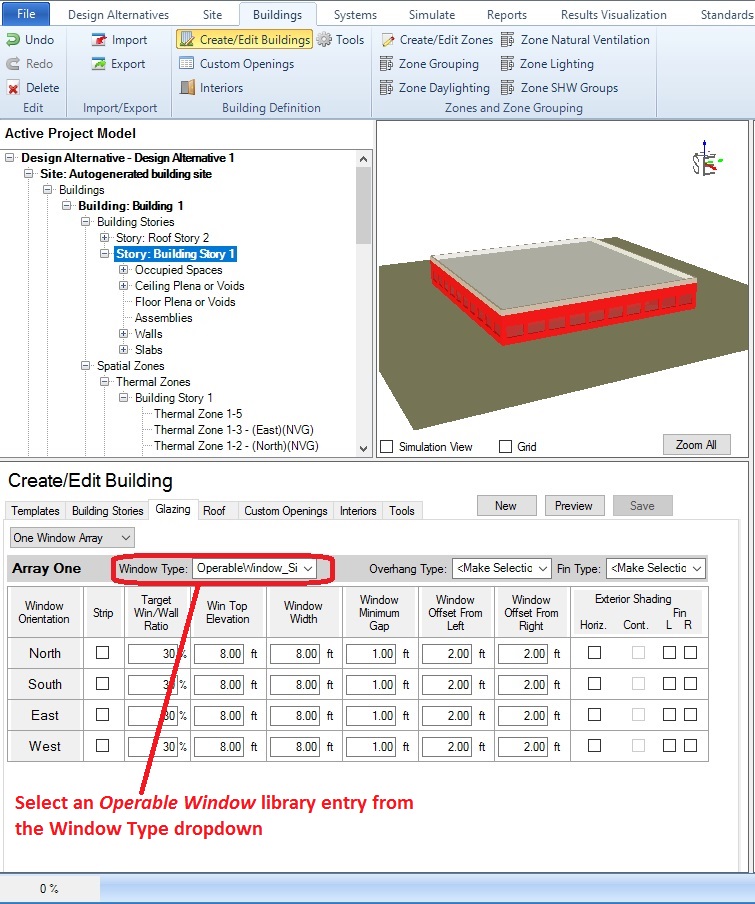
Next, the user selects which windows are operable and defines various opening parameters for each window opening. This is done through the Glazing and/or Custom Openings tab(s).
To select and apply one operable window type to all the windows in the building, use the Glazing tab and select an operable window Library item from the Window Type drop down menu, then click preview and save.
As you start to develop more complex Natural Ventilation models, you might find the need to have a "Detailed" Natural Ventilation Setting (Natural Ventilation Template) at the overall building level and also "Detailed" Natural Ventilation Settings (Natural Ventilation Template) at a Zone Ventilation Group(s) level. The model can be set up in the same manner as described in Scenario 3 and Scenario 4.
The main thing to keep in mind is, when a Natural Ventilation Template is selected at the whole building level it will be applied to every zone in the model except those zones that are part of a Zone Natural Ventilation Group. The Natural Ventilation Template selected for the Zone Natural Ventilation Group will override the template selected at the whole building level for the zones included in the Zone Natural Ventilation Group.
When considering natural ventilation as a design strategy for different climates, a Mixed-Mode ventilation system might be the best approach to integrate natural ventilation into the design. A Mixed-Mode ventilation system is a hybrid ventilation approach (natural ventilation + mechanical) that uses a combination of natural ventilation from operable windows and mechanical systems that include air distribution equipment, and air conditioning equipment. The approach to set up a mixed mode system differs based on the type of HVAC System you are working with. If you are working with a system that doesn't have an explicit Air Loop set up then mixed mode capability is introduced at the Zone HVAC Group level via the Hybrid Availability Manager. If the HVAC system does have an air loop associated with it then the mixed mode capability is introduced in the Loop Level Controls via the Hybrid Availability Manager. Let's take a closer look at some examples.
Where to find: C:\Users\Public\Simergy\Samples\Sample_Projects - - ASHRAE-3_PSZ_V3_MixedMode.simp
If you are interested in seeing and exploring how a mixed mode model is set up in Simergy, take a look at the sample project - ASHRAE-3_PSZ_V3_MixedMode. The sample project is a simulation ready SImergy file of ASHRAE Baseline System 3 (90.1-2010) incorporating Packaged Single Zone (PSZ) systems.
The sample project contains two design alternatives:
Recommendation: Run simulations for both design alternatives and compare the results.
Step 1: Select design alternative 1 on the Design Alternatives tab and then go to the Simulate Workspace and run the simulation configurations that have already been set up with the file.
Step 2: Select design alternative 2 on the Design Alternatives tab and then go to the Simulate Workspace and run the simulation configurations that have already been set up with the file.
Step 3: Go to the Results Visualization Workspace. Select Manage and then select a similar type simulation run (whole year or design day) for both Design Alternative 1 and 2 and then compare the results
and transform it into a Mixed Mode System, you would need to do a couple of things:
This can be accomplished in either of the following ways:
- Whole Building - Select Detailed and select Natural Ventilation Template. Applies to all of the thermal zones in the model, unless the thermal zones are part of a Zone Natural Ventilation Group that have a Natural Ventilation Template assigned to them.
- Zone Natural Ventilation Groups - set up a single or multiple groups with desired sets of thermal zones included. Assign Natural Ventilation Templates to each of the Zone Natural Ventilation Groups.
- A combination of the previous two...
ASHRAE System 1 contains a packaged terminal air conditioning unit, which is self contained and does not need an air loop set up. Therefore the mixed mode capabilities need to be added at the Zone HVAC Group Level.
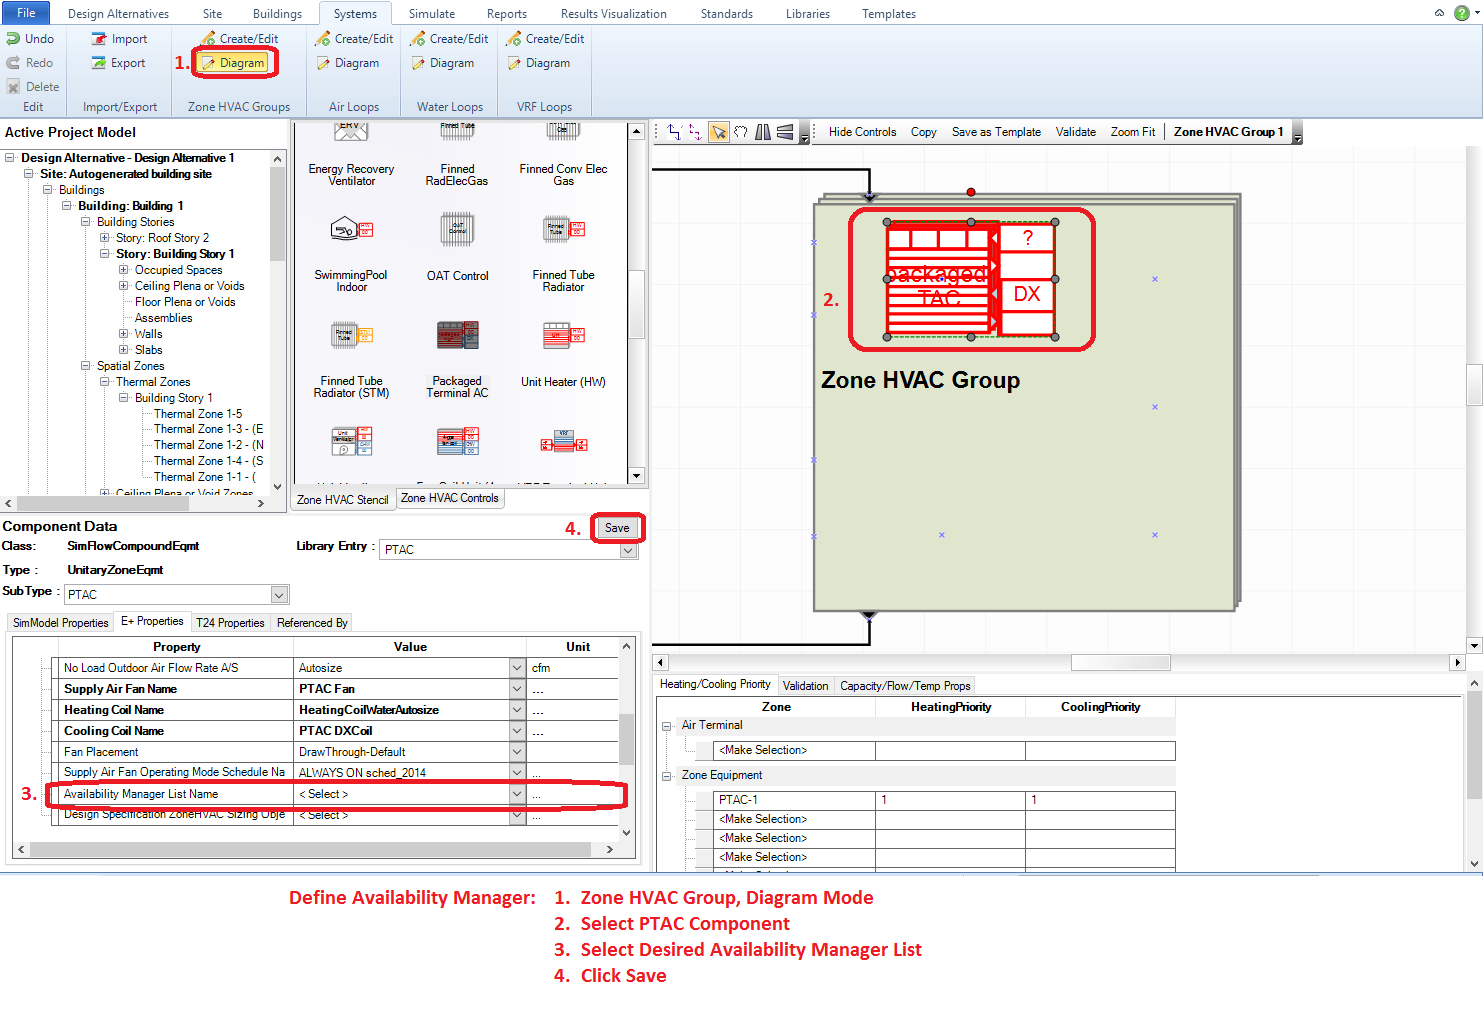
The image shows the Zone HVAC Diagram Mode for System 1, where the PTAC object has been selected and the properties are displayed on the lower left.
Before hitting Simulate on a Simergy Model it is important to make sure that you have a relevant Output Request Set associated with it. The table outlines recommendations for Output Request Sets that are included in the Simergy Library to associate with different types of natural ventilation model configurations. You can always build your own or adapt the ones in the library, but the intent is to provide a good starting point. If you are interesting in seeing the output variables associated within each ORS that is included in the Simergy Library, click here.
| Natural Ventilation Modeling | Recommended Output Request Set |
| NatVent - Simple setting | NatVent Variables - Simple Set |
| NatVent - Detailed setting | NatVent Variables - Detailed Set |
| Mixed Mode - Simple Setting | MixedMode Variables - Simple Set |
| Mixed Mode - Detailed Setting | MixedMode Variables - Detailed Set w/ zones |
Note: In Results Visualization there currently are not any Results Screens set up for Natural Ventilation modeling, however you can create your own.
______________________________________________________________________________________
© Copyright 2013 Simergy, Sustainable IQ, Inc.