Part of Workspace: Simulation
The workspace area table allows users to set up or different simulation configurations, assign templates related to different parameters and keep track of when the configuration was set up and the simulation was run. The columns in the table are:
Identifies the configurations that have been set up for each different baseline or design alternative model. If a copy of a model is made on the Design Alternatives tab, then the configurations for both the original model and the copy of the model will be displayed in the Configuration table. To identify the current, active model look to the top of the project tree located in the workspace area above the configuration table. To change the current design alternative the user needs to go to the Design Alternative workspace and select the desired design alternative from the Design Alternatives palette table. By changing the design alternative selection, when the user returns to the configuration table, the simulation configurations for that design alternative will now be displayed.
Once the desired configurations have been created and the desired templates associated with them the user selects the configuration and then selects Run Simulation. A SimRun sub-row will appear below the selected configuration row and will provide status on the simulation progress and will indicate (view results appears) when the simulation has been completed.
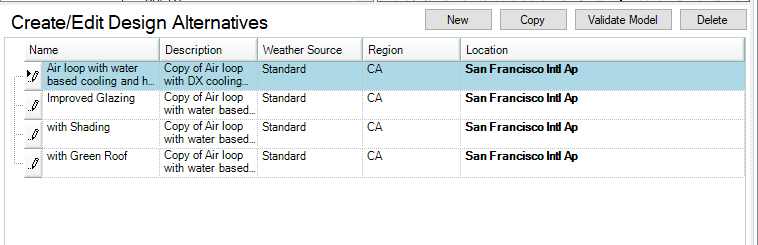
The user has set up two design alternatives in addition to the baseline model.
BEM Design Alternatives Palette from the Design Alternatives tab.
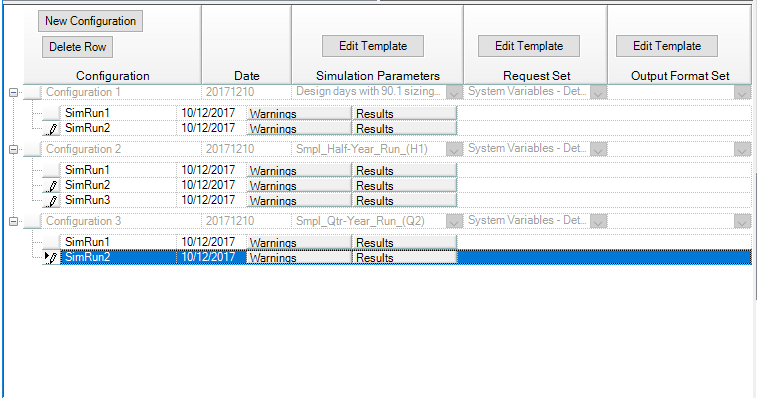
Simulation Configuration table on the Simulate tab for Baseline Design and Design Alternative 1.
The default naming convention is a sequential numbering after Configuration (Configuration 1, Configuration 2...). For SimRun, which appear once a configuration is highlighted and Run Simulation is selected, is also a default naming using sequential numbering (SimRun1, SimRun2...). All the default names can be changed by selecting within the cell and entering the desired text.
In the configuration column there are two buttons located above the header:
SimRun rows - Each time a simulation is run for a configuration a new SimRun row is added to the table. These sub-rows identify the date the simulation was completed and also include a view results button that when selected takes the user to the Reports tab. While the Simulation is running the status of the simulation is being reported in the location where view results is shown when the simulation is complete.
Displays the when the Configuration was set up by the user. It does not describe the date when the simulation was run.
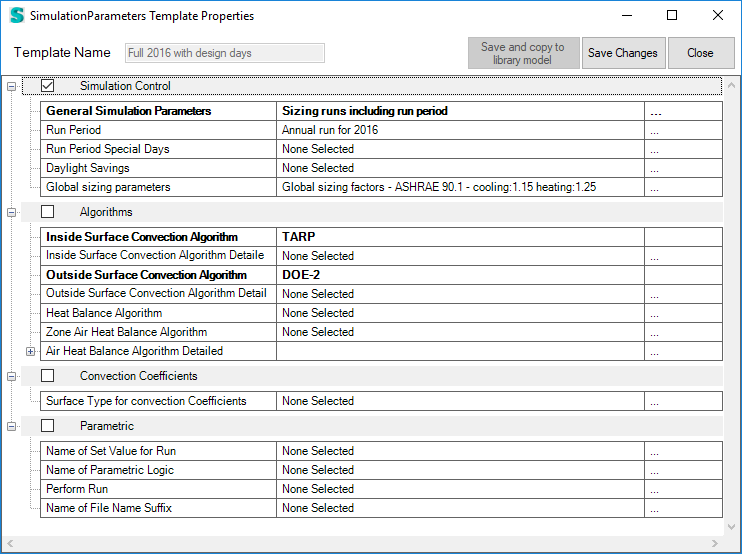
User can select a template from the drop-down list that either they have created or that is included with Simergy, which establishes properties for simulation control, algorithms associated with the simulation, ground heat transfer control, convection coefficients and parametrics.
Edit Template - allows the user to review and edit the content of a template that has been selected from the drop-down list without having to go to the Template tab. Upon selection a pop-up dialog box appears presenting the user with the same Properties table that is available within the Template workspace. The user can review the current selections or make changes by selecting different Library Entries from the drop down list and select Save Changes. The changes are saved to the Template associated with the project model.
User can select an Output Request Set Template from the drop-down list that either they have created or that is included with Simergy, which establishes what EnergyPlus output variables will be associated with the simulation run and therefore available for selection/investigation within Results Visualization.
User can select a template from the drop-down list that either they have created or that is included with Simergy, which establishes formatting styles and tolerances. Note that a majority of the settings defined within the Output Formats Library Entries and the Output Formats Templates can be overridden within Reports and Results Visualization.
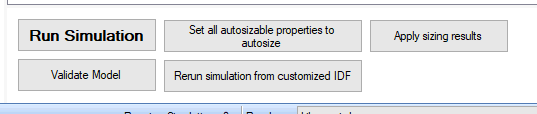
Starts a run of the current configuration.
This button will begin a validation of each system loop and zone hvac group in the model and when complete, open a window showing any validation errors in each system.
If any property can be set to autosize, this button will set them all to autosize.
If a customized IDF file has replaced the default in.idf file in the simulation output files folder, the simulation can be run again with the new file. See Simulate IDF not from Simergy for more info.
If any properties were set to autosize on the last run, you can apply the sizing result found during that run by clicking this button.
______________________________________________________________________________________
© Copyright 2013 Simergy, Sustainable IQ, Inc.