Location = Templates/Data Templates/Constructions
Workspace = Typical Libraries Workspace
Workspace Area 1: Data Template Naming/Selection
Workspace Area 2: Data Template Property Table
Related Workspaces:
The Construction Templates Workspace is where users can define the material assemblies for the entire model, exterior and interior, and for all surface types, opaque and fenestration, which can then be associated by the user with the Zone Groups that have been created on the Buildings/Zone Grouping workspace.
The table identifies the Libraries Category source for the drop down list for each row of properties within the Template. If the user wants to create a new library entry to incorporate into a template they will need to go to the Libraries Tab and the Library Category identified to create the library entry that will then appear in the drop down list after it has been created.
Note: The library entries displayed on the drop down lists are also influenced by what Source Library is active.
| Property Category | Property Name | Value Sources |
| Opaque Constructions | Exterior Wall Construction | SimMaterialLayerSet/OpaqueLayerSet/Default |
| Exterior Floor Construction | SimMaterialLayerSet/OpaqueLayerSet/Default | |
| Interior (Interzone) Floor Construction | SimMaterialLayerSet/OpaqueLayerSet/Default | |
| Roof Construction | SimMaterialLayerSet/OpaqueLayerSet/Default | |
| Slab-on-grade Construction | SimMaterialLayerSet/OpaqueLayerSet/<All Sub Types> | |
| Radiant Slab Construction | SimMaterialLayerSet/OpaqueLayerSet/InternalSource | |
| Underground Wall Construction | SimMaterialLayerSet/OpaqueLayerSet/<All Sub Types> | |
| Underground Floor Construction | SimMaterialLayerSet/OpaqueLayerSet/Default | |
| Ceiling Construction | SimMaterialLayerSet/OpaqueLayerSet/Default | |
| Interior/Partition Wall Construction | SimMaterialLayerSet/OpaqueLayerSet/Default | |
| Radiant Wall Construction | SimMaterialLayerSet/OpaqueLayerSet/InternalSource | |
| Raised Floor Construction | SimMaterialLayerSet/OpaqueLayerSet/Default | |
| Opaque Doors | SimMaterialLayerSet/OpaqueLayerSet/Default | |
| Fenestration Constructions | Windows, North | SimMaterialLayerSet/GlazingLayerSet/Default |
| Windows, South | SimMaterialLayerSet/GlazingLayerSet/Default | |
| Windows, East | SimMaterialLayerSet/GlazingLayerSet/Default | |
| Windows, West | SimMaterialLayerSet/GlazingLayerSet/Default | |
| Exterior Glass Doors | SimMaterialLayerSet/GlazingLayerSet/Default | |
| Skylights | SimMaterialLayerSet/GlazingLayerSet/Default | |
| Interior Windows | SimMaterialLayerSet/GlazingLayerSet/Default | |
| Interior Glass Doors | SimMaterialLayerSet/GlazingLayerSet/Default |
The process for creating project surface constructions (including walls, windows, roofs, etc) starts at the material definition in the Libraries Materials Workspace and builds up from there. At each step the user can select library entries that are included with Simergy and/or they can create their own. Each of the following steps builds on the previous step:
1) Create / Confirm all needed Materials for the Walls, Roof and Windows are present within the Libraries - Materials
a) Confirm that all of your project’s materials are present in the Materials Library (e.g., Face Brick, Aluminum siding, special project glazing). An example library entry is shown below.
b) Add any missing materials by creating any new Material Library Entries
2) Create / Confirm material thicknesses are included in Libraries - Mat'l/Glaz Layer Sets
a) Confirm that all of your project’s materials have a version with proper thickness in the Mat’l/Glazing Layers Library (e.g., Face Brick @ 4”, Aluminum siding @ 0.05”, special project glazing @ 0.25”)
b) Add missing thicknesses to materials that require them.
3) Create / Confirm layer sets are set up in Libraries - Mat'l/Glaz Layer Sets
a) Confirm that all of your project’s materials are represented (e.g., 4” Face brick + Insulation + drywall, or 0.25” Guardian Sunguard Royal Blue + 0.5” krypton + 0.25” clear glass), and then
b) Add missing layer sets by creating any new Mat'l/Glaz Layer Sets Library Entries
c) Define the layers of the Mat'l/Glaz Layer Set for the Library Entry from the exterior layer first (Outside Layer) and then each subsequent layer moving inward for applicable layers 2-10. The example below shows that for the Exterior_Brick/MtlStud library entry has an outside layer of "Common Brick", a second layer of "Metal Studs with 6" of insulation" and a third layer of 1/2" gypsum board, which is the interior finish.
4) Assign the Mat'l/Glaz Layer Sets to the appropriate line items in the Template - Constructions
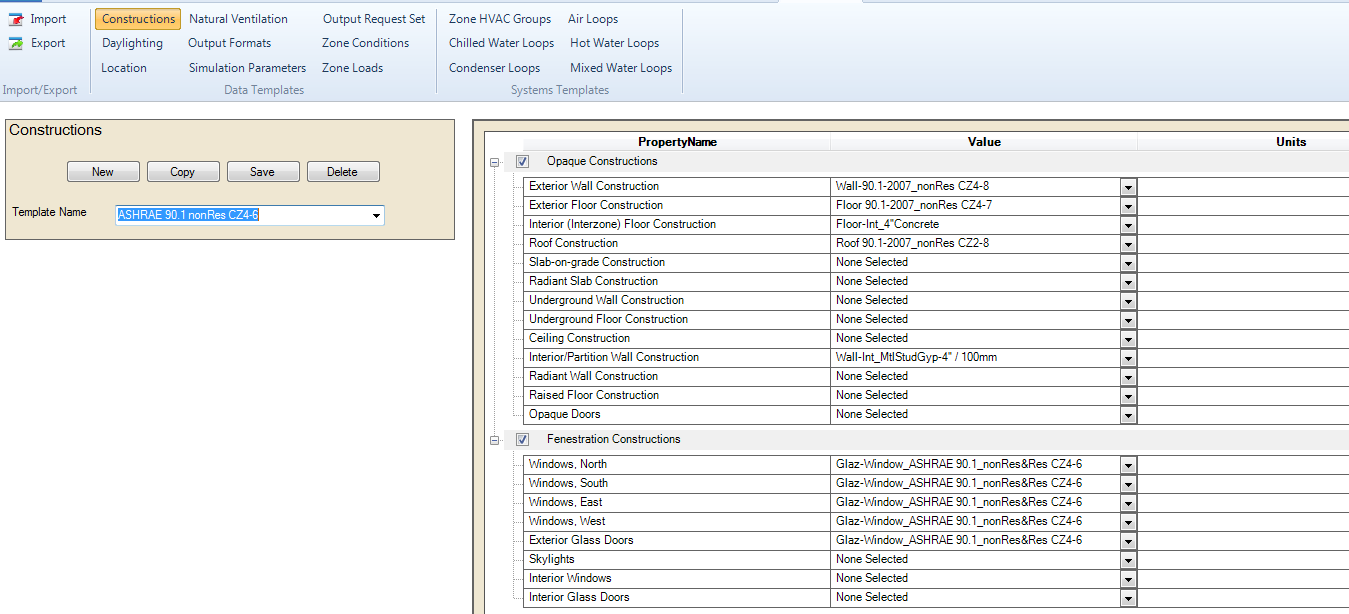
a) Select an acceptable Construction Template in the Library for an ASHRAE 90.1 Baseline simulation (select one that is proper for the project climate zone). The example below shows the different line item options for opaque and fenestration constructions and shows which ones have been specified for the selected "BuildingConstructions" template. The drop-down lists for each row in the Value column are determined by what library entries are incorporated into the Mat'l/Glaz Layer Sets for the current Library.
b) Create a new Constructions Template which uses all of the proper Mat'l/Glaz Layer Sets
5) Assign the construction template to each zone group in the Buildings|Templates workspace
a) Assign the proper Constructions Template to the building in the first tab in the Create/Edit Buildings workspace ("Templates").
Users can also select the Edit Template Values to the right of the Construction Template Dropdown. A pop-up dialog box will appear (shown below), which allows the user to make and save changes to the Construction Template so that they don't have to go back to the Template/Constructions workspace. This can be a significant time saver.
______________________________________________________________________________________
© Copyright 2013 Simergy, Sustainable IQ, Inc.