Location: Libraries/Schedules
Video: Libraries - Schedules and Calendar
In Simergy a schedule is defined as a full calendar year of days each with a schedule profile assigned to it. Schedules are viewed, built and edited in the Libraries Schedules Workspace. To build a schedule the user needs to do the following steps:
Select a Schedule Type from the drop down list (top of image).
Select a Schedule Name (Schedule sub type) to work with or create a new one.
Select a Special Days Calendar to associate with the Schedule (Note: this action is not required).
Draw a profile in the Graphic Profile Editor (bottom left on image) and Save it.
Once a Schedule Profile has been saved it will appear in the Profile Workbook (middle left).
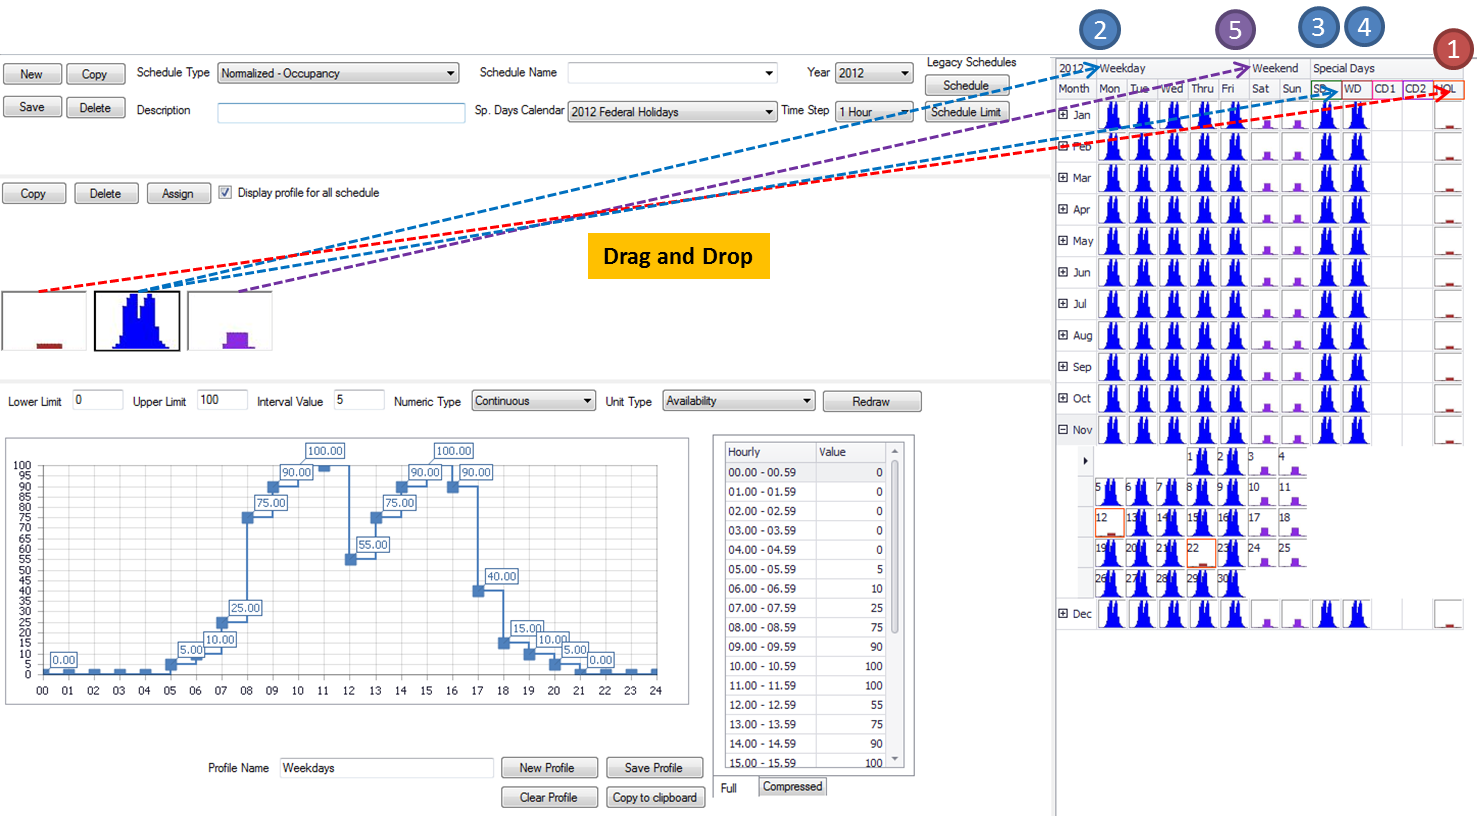
Once the user has the desired Schedule Profiles in the Profile Workbook then can begin the process of dragging and dropping the Profiles onto the Year Schedule Workbook (right side). Note: There are numerous drag and drop features allowing capabilities ranging from applying one Schedule Profile to the entire year (drag and drop to the year shown in upper left corner of Year Schedule Workbook) to applying Schedule Profiles to single days. It is beneficial to review the options in the Schedules section.
Enter a name in the Schedule Name field and hit Save. The schedule will now be available in the Schedule Name drop down list for the Schedule type that it is associated with. Note: A schedule cannot be saved unless a Schedule Profile has been associated with every day of the year.
The example above shows how with five (5) drag and drop moves from the Profile Workbook to the Year Schedule Workbook can set up the profiles for the entire year for a schedule. Now all that is left for the user to do is to enter a schedule name and hit save.
Drag and drop - the user can select a profile image and then drag it over to the desired location on the Year Schedule Workbook to apply it. Note: there a number of ways that the user can drag and drop the profile onto the Year Schedule Workbook:
Apply to the year - drag and drop to the year label on the upper left corner of the Year Schedule Workbook
Apply every weekday - drag and drop to the weekday header
Apply to every weekend - drag and drop to the weekend header
Apply to every Tuesday for the year - drag and drop to the Tuesday header
Apply to every Tuesday within May - drag and drop to the cell for Tuesday in May if the month is not expanded
Apply to a single day - drag and drop to the specific day.
______________________________________________________________________________________
© Copyright 2013 Simergy, Sustainable IQ, Inc.