
When the user selects Schedules from the ribbon within the Libraries tab they are provided with an option to select one of two work spaces:
Schedules allows users to view, review and create daily profiles to build yearly schedules for their energy models in different ways. Users can create explicit and compact schedules:
- Explicit – the user can define values for each hour of the day within the table
- Compact – the set of intervals where the value
Within schedules the user can create, view and edit daily profiles and yearly schedules. Daily Profiles can be used in more than one schedule. In EnergyPlus schedules consist of three pieces: a day description, a week description, and an annual description. Simergy has the same three pieces however there is less emphasis on the week description. The foundation is the daily profile. Once the daily profiles are established the user can associate these profiles with a particular Special Day Type, a single day, a period of days, a week, a month, or even a year. The user is not required to follow the day to week to year structure as in EnergyPlus, these are created automatically by Simergy. The capabilities of the Year Schedule Workbook enable the user to be more flexible.
EnergyPlus Objects covered by this capability include - ScheduleTypeLimits; Schedule:Day:Hourly; Schedule:Day:Interval; Schedule:Day:List; Schedule:Week:Daily; Schedule:Week:Compact; Schedule:Year; Schedule:Constant; Schedule:File;
The Libraries Schedules Workspace includes:
Schedule Controls
Profile workbook
Graphical profile editor
Year schedule workbook
Schedule Controls allow the user to select, name and/or rename schedules, choose the year and time step and create new, copy, save or delete schedules.
Prior to doing work in the schedule workspace the user should select a schedule type by selecting one of the options from the drop down list. The schedule types include:
Schedule Type |
Lower Limit |
Upper Limit |
Interval |
Numeric Type |
Unit Type |
Normalized - Utilization |
0 |
100 |
5 |
Continuous |
Availability |
Normalized - Occupancy |
0 |
100 |
5 |
Continuous |
Availability |
Normalized - Plug Loads |
0 |
100 |
5 |
Continuous |
Availability |
Normalized - Lighting |
0 |
100 |
5 |
Continuous |
Availability |
Normalized - Miscellaneous |
0 |
100 |
5 |
Continuous |
Availability |
Normalized - Ventilation |
0 |
100 |
5 |
Continuous |
Availability |
Normalized - Infiltration |
0 |
100 |
5 |
Continuous |
Availability |
Normalized - Service Water Heating |
0 |
100 |
5 |
Continuous |
Availability |
Normalized - Availability |
0 |
100 |
5 |
Continuous |
Availability |
Temperature |
-60 |
160 |
10 |
Continuous |
Temperature |
Relative Humidity |
0 |
100 |
10 |
Continuous |
Percent |
Clo Value |
0 |
4 |
1 |
Continuous |
Dimensionless |
Activity Level |
0.5 |
9 |
0.5 |
Continuous |
ActivityLevel |
Predicted Mean Vote |
-4 |
4 |
1 |
Discrete |
Dimensionless |
Blind Angle |
0 |
90 |
10 |
Continuous |
Angle |
Carbon Dioxide Concentration |
0 |
2000 |
100 |
Discrete |
Parts Per Million |
Availability On/Off |
0 |
1 |
0.05 |
Continuous |
Availability |
Zone Control Option |
1 |
4 |
1 |
Discrete |
Control |
Any Number |
-99999 |
99999 |
10000 |
Continuous |
Dimensionless |
By creating and saving a schedule name, the user is creating a sub-type of the active Schedule Type for the project. Once a schedule name has been saved it is available to the user from the drop down list. The Schedule name shown indicates the active schedule sub-type.
Note: To be able to save the schedule name for the sub-type the user needs to have profile or profiles associated with the full year. Otherwise a warning message will appear.
Descriptive notes can be typed, which will be associated with the Schedule Name sub-type. After the notes have been saved they will appear in this field each time the Schedule Name sub-type is selected.
Tip: if including notes with a schedule name sub-type remember to hit save prior to selecting another schedule name sub-type from the drop down list or a Schedule Type.
The user can set up Special Days Calendars within the Libraries/Calendars workspace. There purpose is to identify special days and special periods of days that can be associated with the special days types, which include Summer Design Day, Winter Design Day, Holidays and custom days that the user can set up. Schedule profiles can be associated with the types of special days so that when the user drags and drags the profile from the Schedule Profile Workbook onto the appropriate Special Days column in the Year Schedule workbook the profile will be associated with each of the days that the Special Day type has been included in the Special Days Calendar automatically.
Provides the ability to associate a specific year with the energy model, which influences the yearly calendar that is associated with the model. The range of years available on the drop down list is 2000 to 2050 with the current year being the default.
Tip: Why change the year? If the user is importing a custom weather file for a particular year, and they want the model calendar to align with that year.
Sets the granularity of the profiles that will be associated with the schedule type and sub-type. The default is 1 hour. The other options from the drop down list are 30, 20, 15 and 10 minute increments.
By selecting any schedule that was currently active is overridden, the graphical profile editor defaults to a blank state and the user can begin the process of creating a new schedule.
Makes a copy of the schedule and all the information associated with it and adds it to the project model library with 'copy of' before the previous name.
Saves the changes made to the schedule
Removes the schedule from the project, but not the source library
These two buttons allow the user to go to a Schedules Workspace that the same layout and capabilities as the typical libraries workspace, so that the user can edit schedules that were not created in Simergy. In addition the user can make edits to the Library Entries directly with all the same capabilities of create New, Copy, Save, and Delete.
Note: If the user wants to return to the Schedules Workspace that shows the Graphic Profile Editor, they can do so by selecting Schedules from the ribbon again.
Accesses the Schedule Library Workspace where the user can either select a Library Entry name or a Type and Sub Type combination to view and access the input values for the selection.
Accesses the Schedule Limits Library Workspace where the user can either select a Library Entry name or a Type and Sub Type combination to view and access the input values for the selection.
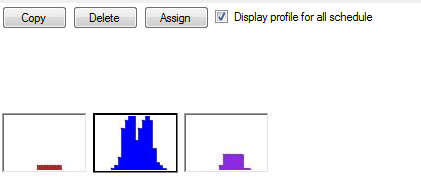
Displays all of the available Schedule Type profiles that have been created. If the user selects a different schedule type for the drop down list and no profiles have been created for that schedule type the profile workbook will be blank. Once a profile has been created and saved using the graphical profile editor, a profile snapshot image will appear in the profile workbook. To see the name of the profile hover the mouse over the profile and the profile name will appear.
Once the user has created a profile or set of profiles they can start to apply those to the Year Schedule Workbook in one of two ways:
Drag and drop - the user can select a profile image and then drag it over to the desired location on the Year Schedule Workbook to apply it. Note: there a number of ways that the user can drag and drop the profile onto the Year Schedule Workbook:
Apply to the year - drag and drop to the year label on the upper left corner of the Year Schedule Workbook
Apply every weekday - drag and drop to the weekday header
Apply to every weekend - drag and drop to the weekend header
Apply to every Tuesday for the year - drag and drop to the Tuesday header
Apply to every Tuesday within May - drag and drop to the cell for Tuesday in May if the month is not expanded
Apply to a single day - drag and drop to the specific day.
The active profile image in the profile workbook will be copied, which results in a new profile image being created for the schedule type within the profile workbook and it will be named "Copy of<copied profile name>", which will appear in the profile name field within the Graphic Profile Editor.
The user can delete a profile by selecting the profile image and then selecting delete.
Note: if the profile has been assigned to a Year Schedule Workbook it will not be able to be deleted (warning message: Day Profile cannot be deleted due to dependencies). Only when all of the instances of the profile use within the Year Schedule Workbook (or use across multiple) are replaced with other profiles can the profile be deleted.
By selecting a specific day, days, occurrences of select days in a months or other selection groups within the Year Schedule Workbook, and then selecting a profile snapshot image, the user can assign the profile to those specific selections. After Assign has been selected the profile images will update within the Year Schedule Workbook.
When selected (default) all profiles associated with the Schedule Type will be shown. When unselected only the profiles associated with the Schedule Name sub-type will be displayed.
Note: If the user changes the profile and re-saves it, an updated profile snapshot image with appear in the profile workbook.
Allows users to create custom profiles and edit profiles that have previously been created. The Graphical Profile Editor has four main capability components
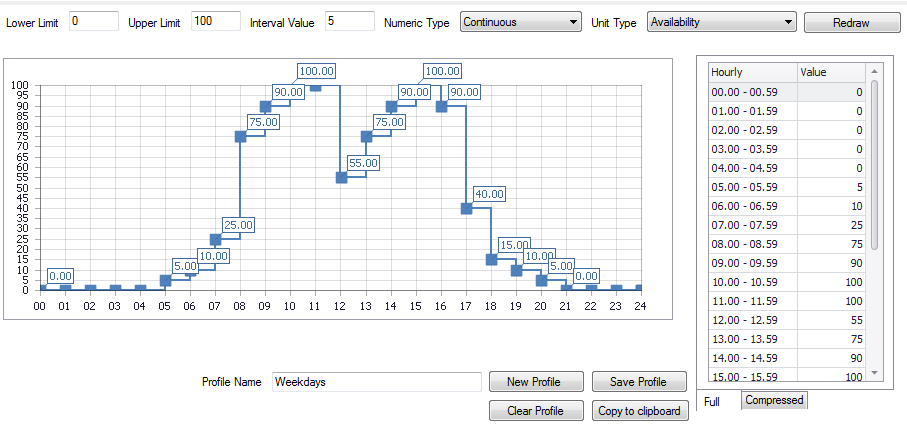
The main visible area where the user can use their cursor to select points on the profile field that will assign hourly values (time step) based on the selection to the profiles. The selections not only appear on the profile field, but the value associated with that selection is listed in the schedule table on the corresponding time step row. The x-axis is time (default = hours) and the y-axis are the schedule limits that will vary in range and unit type based on the schedule type that has been selected [schedule type table]. If the user adjusts the time step to a value lower than hourly the profile field will be denser since more vertical delineations are being added to the x-axis due to the increased granularity of the time step. The y-axis schedule limits can be edited by changing the values in the profile controls.
The "y-axis" on the profile field displays the schedule limits that are associated with that Schedule Type and Schedule Name (sub-type) and the interval value establishes the granularity of the numbers displayed. Default schedule limits (lower limit, upper limit, interval value, numeric type and unit type) are set up within Simergy for each of the Schedule Types.
Displays the lower limit value shown on the y-axis at the bottom of the profile field. The user can enter new values here, and then select Redraw to update the appearance of the profile field. Default values for each schedule type are included in Simergy.
Displays the upper limit value shown on the y-axis at the top of the profile field. The user can enter new values here, and then select Redraw to update the appearance of the profile field. Default values for each schedule type are included in Simergy.
Establishes the number of divisions shown on the y-axis, which influences the granularity of point selection on the profile field provided to the user. For example, if the interval is set to 1 degree, and the user wants to select a 0.5 degree point, they are not going to be able to do that on the profile field unless the interval is lowered to 0.5 vs. 1 degree. Another approach would be to enter the .5 value in the schedule table and then it will appear on the profile field at the 0.5 increment, even though the interval for the profile field is set to 1.
This field designates how the range values are validated. Using Continuous in this field allows for all numbers, including fractional amounts, within the range to be valid. Using Discrete in this field allows only integer values between the minimum and maximum range values to be valid. (source: EnergyPlus Input Output Reference Guide).
This field is used to indicate the kind of units that may be associated with the schedule that references the ScheduleTypeLimits object. It is used by IDF Editor to display the appropriate SI and IP units. This field is not used by EnergyPlus. The available options are shown below. If none of these options are appropriate, select Dimensionless. (source: EnergyPlus Input Output Reference Guide).
If any of the profile control variables are changed, the adjustments will be shown on the profile field once the redraw button has been selected, and those values will be associated with the Schedule Type and Schedule Name (sub-type).
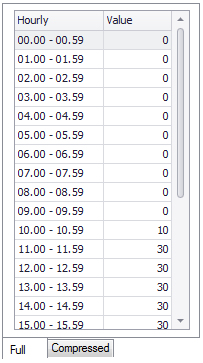
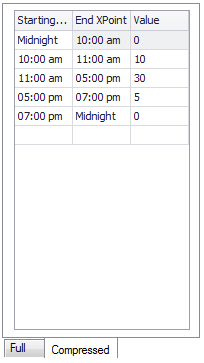
The user can select either to view this field as a FULL (default) or COMPRESSED schedule table by selecting either the "Full" or "Compressed" tabs at the bottom of the table. The full schedule is a table comprised of a column for the time step and a column for the value. The table includes a row for each time step interval for the day that has been selected by the user. The compressed schedule contains a column for the "Time Step Start", one for the "Time Step End" and one for the "Value".
Tip: The schedule tables and profile field are bi-directional. If the user selects a point on the profile field the value will appear in the table on the corresponding time step row, or if the user inputs a value on a time step row within the table then the point will appear on the profile field. Therefore the user can edit profiles from either the profile field or the full or compressed schedule tables.
Shows the twenty four hour period of the day in single hour intervals, which require values to shape the schedule profile.
Like the “regular” schedule object, each schedule:compact entry must cover all the days for a year. Additionally, the validations for DaySchedule (i.e. must have values for all 24 hours) and WeekSchedule (i.e. must have values for all day types) will apply. Schedule values are “given” to the simulation at the zone timestep, so there is also a possibility of “interpolation” from the entries used in this object to the value used in the simulation.
The location where the profile name appears if a profile image has been selected from the profile workbook, where they can edit the name of an existing profile or where the user types the name for a profile to be created.
Deactivates the current profile and resets the profile field so that the user can start the process of creating a new profile.
Saves the current profile information to the project. Note: to save a profile a value for each of the time step intervals has to be selected or input.
Provides a "clean slate" for the user to draw a new profile.
Tip: If the user has drawn a profile previously, save it before selecting Clear Profile because it will not be saved automatically.
Makes a copy of the current profile.
An interactive table that provides the user the ability to assign and view profiles for every day and day type of the year. As a simulation validation check, the user will not be able to save a Schedule Name Type unless a profile has been assigned to each day (week day and weekend day) of the year.
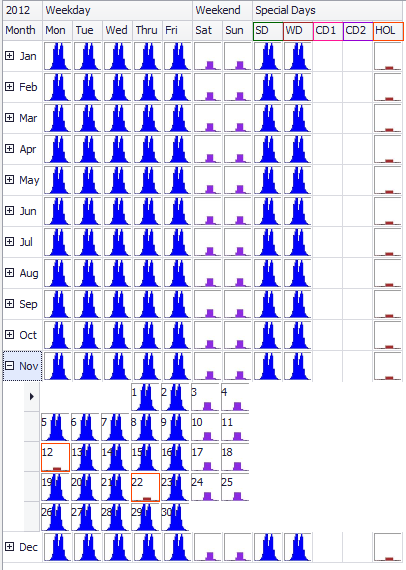
The interactive table shows the days and day types are shown across the top and the months are displayed vertically on the vertical axis. The key components include:
Year - upper left corner
Weekday is displayed above the days of the week
Weekend is shown above the weekend days (Sat, Sun)
Special Days is shown above:
SD - Summer Design Day
WD - Winter Design Day
CD1 - Custom Day 1
CD2 - Custom Day 2
Hol - Holiday
Months of the year are shown on the y-axis (vertically). The default view is to show a single row for each month. If the user selects the "+" button the view will expand to the show all the days for the selected month for the corresponding year. In expanded mode the user can select individual days to drag and drop or assign profiles to. The month can be compressed as easily as it was expanded.
Once the user has created a profile or set of profiles they can start to apply those to the Year Schedule Workbook in one of two ways:
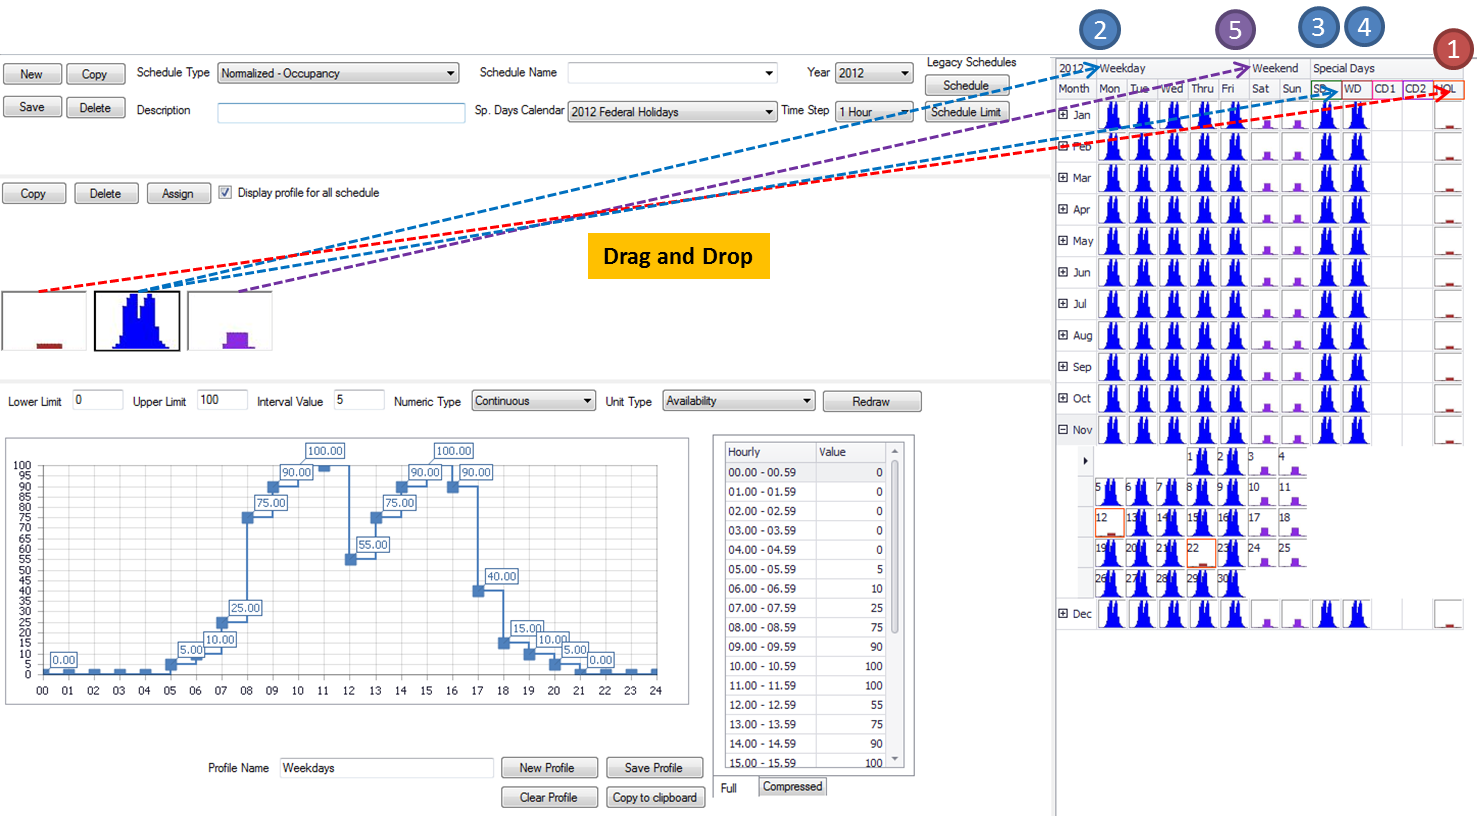
The example above shows how with five (5) drag and drop moves from the Profile Workbook to the Year Schedule Workbook can set up the profiles for the entire year for a schedule. Now all that is left for the user to do is to enter a schedule name and hit save.
Drag and drop - the user can select a profile image and then drag it over to the desired location on the Year Schedule Workbook to apply it. Note: there a number of ways that the user can drag and drop the profile onto the Year Schedule Workbook:
Apply to the year - drag and drop to the year label on the upper left corner of the Year Schedule Workbook
Apply every weekday - drag and drop to the weekday header
Apply to every weekend - drag and drop to the weekend header
Apply to every Tuesday for the year - drag and drop to the Tuesday header
Apply to every Tuesday within May - drag and drop to the cell for Tuesday in May if the month is not expanded
Apply to a single day - drag and drop to the specific day.
Schedule Types - The following schedule types are not currently provided as options
Time of Use
Season
Month
Real Time Pricing Charg
Customer Baseline Load
2
______________________________________________________________________________________
© Copyright 2013 Simergy, Sustainable IQ, Inc.